
Welcome to BAT Software!
This onboarding guide will help you set up your account and get started quickly. It walks you through the essential first steps, from activating your account to engaging with BAT AI, so you can begin using BAT efficiently.
1. Activate Your Account
You should have receive an email to change your password before this email. Please follow the links provided there to change the password and activate your account. You will have a one hour window to change the password before the link expires. If the link has expired, follow these steps to get another one hour link:
- Visit https://app.batsoftware.co.uk
- Click ‘Forgot Password’ to set your new password.
- Enter your email address and submit.
- Check your inbox (and spam/junk) for the new reset email.
- Open the link and set your new password within one hour.
2. Set up your Two Factor Authentication (2FA)
Two-Factor Authentication (2FA) adds a second step to your BAT login to keep your account and client data secure. After you link your BAT account to an authenticator app on your phone (we recommend Microsoft Authenticator or Google Authenticator), the app generates a 6-digit code that refreshes every 30 seconds. Each time you sign in, you’ll enter your password and then this code, so even if your password is known, only your verified device can unlock your account.
Linking your BAT account to 2FA is mandatory. Please follow these steps:
-
In BAT, click “2FA Not Enabled.”
-
Open your authenticator app on your mobile.
-
Add a new account (usually Add account or +) and scan the QR code shown in BAT.
-
When a six-digit code appears in the app, enter it in BAT and click Verify. (Codes refresh about every 30 seconds, so ensure the code hasn’t just changed.)
-
That’s it, your BAT account is now protected with 2FA.
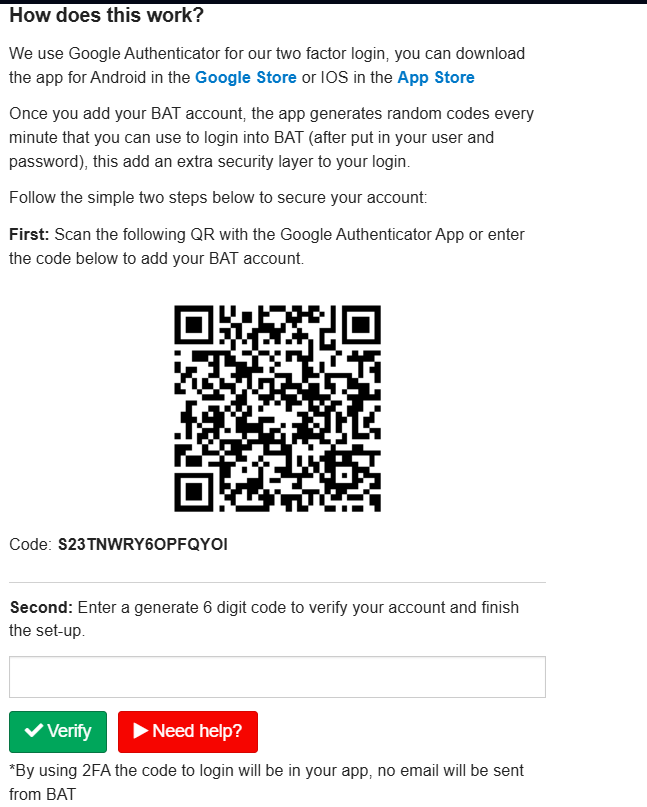
For more help, please follow this step-by-step video on setting up 2FA.
3. Upload Client Data to Client Book
After activating your account, create your first client record.
Go to Clients → Clients & Prospects → Add Client.
When adding a client, the more information you provide, the better your outcomes. However, for testing BAT, only the mandatory fields (marked with a red asterisk) are required to proceed.
You can create client records individually (ideal for testing the platform) or in bulk (recommended for implementation at scale).
4. Record a New Business in Business Book
After creating the client record, upload the policy details to BAT so a file check request can be created for it. As with the Client Book, the more information you provide, the better the outcomes.
BAT is designed for advisers and compliance staff to work in the same space. Adding complete policy data to your Business Book helps reduce delays and back-and-forth on administrative queries.
Attach policy documents in the Documents section for the AI to engage.
To record a new policy, go to Business Book → Business Book → Add Policy.
Once the policy is created, if the Auto File Check tool is set to 100% completeness, the request will be created automatically. However, if it is set to less than 100%, you can manually request a file check and engage the AI by clicking the Request File Check button.

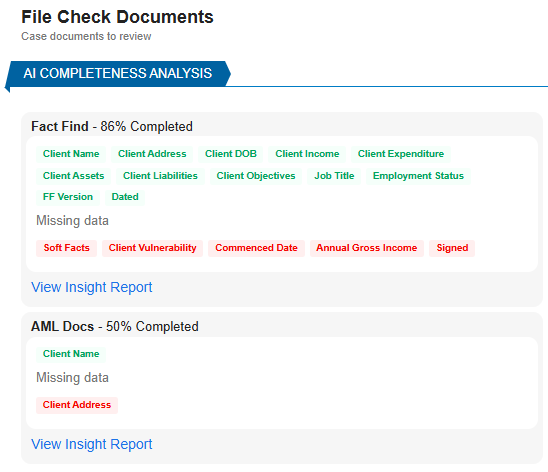
5. Run a File Check on BAT AI
When the file check has been requested for a policy, the AI will be engaged. To check the AI Completeness score you need to go to Compliance > File Checks > View. Once you are inside the individual file check request created for the new policy, you will be able to see stage one (if finished) Completeness. This stage will show you how complete the submitted documents are. The AI will look for certain defaulted datapoints and retrieve feedback in a green/red basis meaning green it is in the document and red it couldn’t be found in the document.
Once document analysis is complete, the AI moves to the File Check Review stage (2), acting as an independent reviewer. BAT provides a default file-checking form covering mandatory FCA compliance requirements; this form can be amended or replaced for a fully customised experience.
To proceed, the file check request must include at least one document in each category. Alternatively, you can manually start the review using the blue “Trigger AI Review Anyway” button.
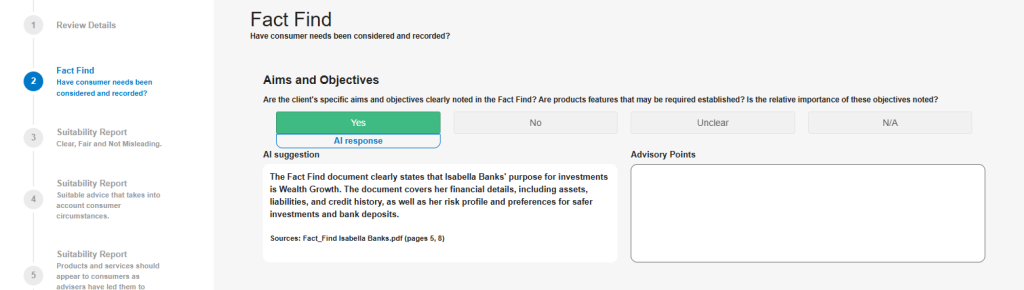
The AI will provide an answer to each question, either Yes, No, Unclear, or Not Applicable, along with an explanation and the sources it used to reach that conclusion.
These answers can be manually overridden by selecting a different response box.